
Monday, July 22, 2013
Bioshock fan art
I don't update this blog thing as much as I should, but I had to throw this up. I finished Bioshock Infinite recently and it was an instant favorite...had to make a tribute that summed up how I felt about such an incredible game.

Sunday, January 29, 2012
Magneto Helmet Build pt. 2
Yep, I was lazy. It took me forever but finally I have here the second part of my helmet build from this last Halloween! These show my process for molding and casting the sculpt from part one. Hope you enjoy!

For this project I decided to try a two part silicone mold. Although it takes a little more time and planning to make the mold this way, it will make my life a lot easier when it comes to casting and demolding because I can remove the mold in pieces. In preparation for pouring the first half of the silicone, I need to build a clay dam to stop the liquid silicone from covering the entire helmet.

The dam is essentially defining the boundaries of the mold…any portion of the sculpt I don’t want cast is walled off, including the bottom. The clay is sulfur-free, sulfur based clay would inhibit the curing of the silicone.

The finished clay dam.

In this photo you can see clearly where the seam will bisect the final mold.

I used Smooth-On’s Rebound 25 brushable silicone for this mold. I progressively build up the mold with layer upon layer of silicone until I have a thick, uniform coating of rubber. The first layer you see here is called a print coat. I’ve diluted the silicone so that the layer is very thin…this prevents air bubbles from forming, which would ruin the surface detail that this coat is intended to capture.

The mold after about three coats of silicone.

After about five coats of silicone I was pretty happy with the thickness of the mold. The little half spheres are registration keys made of hardened silicone, they will ensure that the silicone mold “locks” into the mother mold correctly every time I assemble the mold for casting.

Once the silicone on the first half is cured, I can turn the sculpt right side up and remove the clay dam.

Here I’ve trimmed off all the excess silicone around the edges of the mold and have added more registration keys. These keys will ensure that the two halves of the silicone mold lock into each other correctly.

The bottom of the sculpt needs to be walled off on this side too in preparation for pouring the second half of the mold.

Silicone doesn’t stick to anything except itself. In order to prevent the second half of the mold from fusing with the first, I coated the exposed rim of the mold with sealing wax. I masked the sculpt so that wax didn’t get on it…I DO want the silicone to stick to THAT!

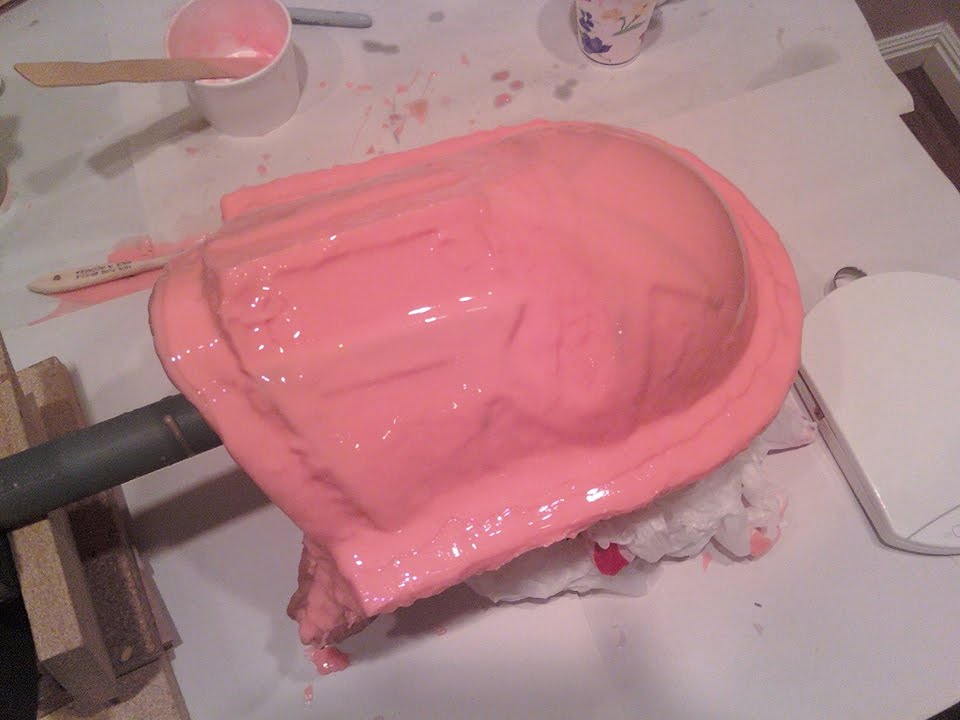
The print coat for the front half.

Filling in the recessed areas with silicone.

The front half after about four coats.

The finished two part mold with registration keys on both halves.

Silicone rubber is excellent for capturing detail, but you can’t stop there because a silicone mold by itself is too flexible to cast into. You need a hard jacket to surround the mold so it keeps the correct shape during casting. This is the frame for my mother mold made from ¼ inch mdf. My mother mold will be a three part jacket that bolts around the assembled silicone mold.

The backside of the frame. The back of the mother mold will split in two, while the front will remain whole.

The completed mother mold. I used Smooth-On’s Plastipaste to make the outer shell. Plastipaste is a fibrous brushable plastic that is very hard and rigid when cured, which makes it ideal for a mother mold. It’s also HEAVY.

The back of the mother mold. The whole assembly is held together with the bolts and wingnuts that join the frame.

Once the mother mold cured I was able to remove the sculpt. Here is the disassembled mother mold with the front and two halves of the back.

The back halves of the mother mold joined together.

Silicone molds inserted into the two halves of the mother mold.

The assembled mold showing the negative left by the sculpt!

I slush cast a few helmets using a couple different resins as tests, ultimately I decided to use polyester resin reinforced with fiberglass. Like the film helmet, my helmet is supposed to fit very closely to the wearer’s head, so I wanted to get my pulls as thin as possible so that they would be comfortable. Fiberglass allowed me to make castings that were thin, lightweight and strong. In this photo I have just finished fiberglassing the interior of one of my castings.

The finished castings require a little bit of touching up to eradicate the mold seam and stray air bubbles.


Two of my fiberglass castings sitting next to each other. Once I’ve taken care of the detailing, I remove the piece in front with a dremel tool. After some sanding and priming, they’re ready for paint!

Due to time constraints, I finished the helmet with off-the-shelf autobody spray paints. I did a couple of tests to get the right colors, and generally I’m pretty pleased with the results. Here I have the first coat of metallic carbon gray masked and ready for the silver trim.

Masking this thing took a while, but was worth the effort!

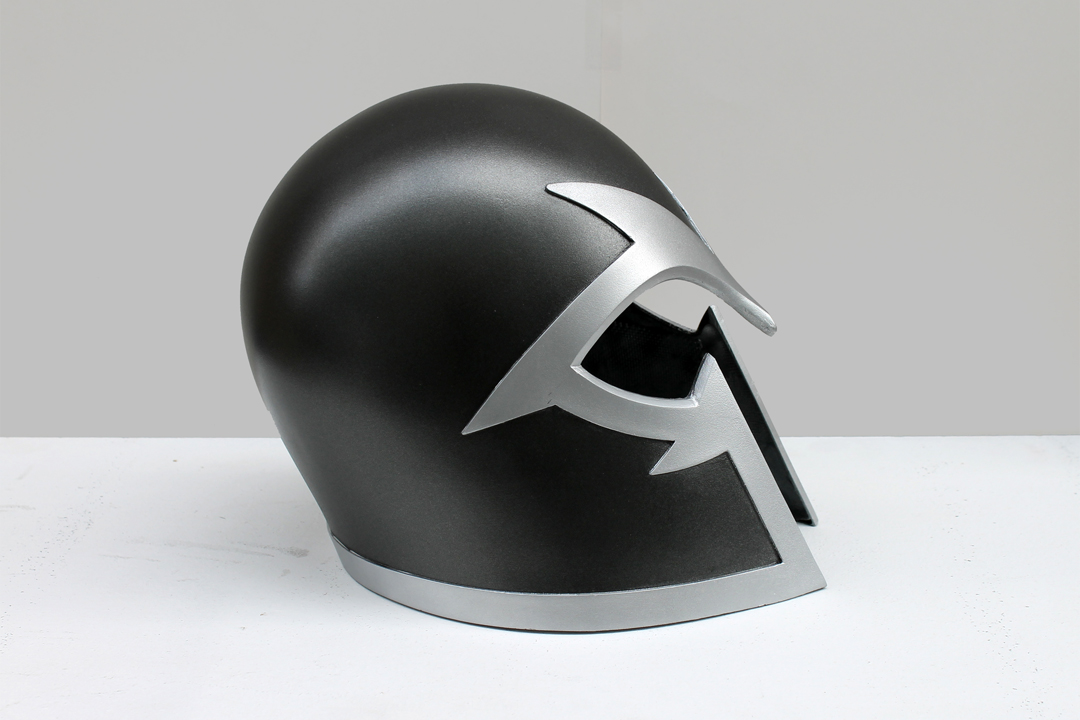
Some shots of the finished helmet. The silver should be more metallic and I skimped on the black inking that lines the border of the trim and feathers into the gray, but I am really pleased with the overall look!


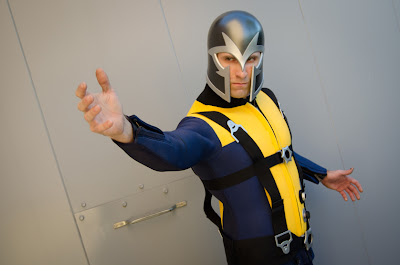
The finished costume for Halloween '11...thanks from taking a look!

For this project I decided to try a two part silicone mold. Although it takes a little more time and planning to make the mold this way, it will make my life a lot easier when it comes to casting and demolding because I can remove the mold in pieces. In preparation for pouring the first half of the silicone, I need to build a clay dam to stop the liquid silicone from covering the entire helmet.

The dam is essentially defining the boundaries of the mold…any portion of the sculpt I don’t want cast is walled off, including the bottom. The clay is sulfur-free, sulfur based clay would inhibit the curing of the silicone.

The finished clay dam.

In this photo you can see clearly where the seam will bisect the final mold.

I used Smooth-On’s Rebound 25 brushable silicone for this mold. I progressively build up the mold with layer upon layer of silicone until I have a thick, uniform coating of rubber. The first layer you see here is called a print coat. I’ve diluted the silicone so that the layer is very thin…this prevents air bubbles from forming, which would ruin the surface detail that this coat is intended to capture.

The mold after about three coats of silicone.

After about five coats of silicone I was pretty happy with the thickness of the mold. The little half spheres are registration keys made of hardened silicone, they will ensure that the silicone mold “locks” into the mother mold correctly every time I assemble the mold for casting.

Once the silicone on the first half is cured, I can turn the sculpt right side up and remove the clay dam.

Here I’ve trimmed off all the excess silicone around the edges of the mold and have added more registration keys. These keys will ensure that the two halves of the silicone mold lock into each other correctly.

The bottom of the sculpt needs to be walled off on this side too in preparation for pouring the second half of the mold.

Silicone doesn’t stick to anything except itself. In order to prevent the second half of the mold from fusing with the first, I coated the exposed rim of the mold with sealing wax. I masked the sculpt so that wax didn’t get on it…I DO want the silicone to stick to THAT!

The print coat for the front half.

Filling in the recessed areas with silicone.
The front half after about four coats.

The finished two part mold with registration keys on both halves.

Silicone rubber is excellent for capturing detail, but you can’t stop there because a silicone mold by itself is too flexible to cast into. You need a hard jacket to surround the mold so it keeps the correct shape during casting. This is the frame for my mother mold made from ¼ inch mdf. My mother mold will be a three part jacket that bolts around the assembled silicone mold.

The backside of the frame. The back of the mother mold will split in two, while the front will remain whole.

The completed mother mold. I used Smooth-On’s Plastipaste to make the outer shell. Plastipaste is a fibrous brushable plastic that is very hard and rigid when cured, which makes it ideal for a mother mold. It’s also HEAVY.

The back of the mother mold. The whole assembly is held together with the bolts and wingnuts that join the frame.

Once the mother mold cured I was able to remove the sculpt. Here is the disassembled mother mold with the front and two halves of the back.

The back halves of the mother mold joined together.

Silicone molds inserted into the two halves of the mother mold.

The assembled mold showing the negative left by the sculpt!

I slush cast a few helmets using a couple different resins as tests, ultimately I decided to use polyester resin reinforced with fiberglass. Like the film helmet, my helmet is supposed to fit very closely to the wearer’s head, so I wanted to get my pulls as thin as possible so that they would be comfortable. Fiberglass allowed me to make castings that were thin, lightweight and strong. In this photo I have just finished fiberglassing the interior of one of my castings.

The finished castings require a little bit of touching up to eradicate the mold seam and stray air bubbles.


Two of my fiberglass castings sitting next to each other. Once I’ve taken care of the detailing, I remove the piece in front with a dremel tool. After some sanding and priming, they’re ready for paint!

Due to time constraints, I finished the helmet with off-the-shelf autobody spray paints. I did a couple of tests to get the right colors, and generally I’m pretty pleased with the results. Here I have the first coat of metallic carbon gray masked and ready for the silver trim.

Masking this thing took a while, but was worth the effort!

Some shots of the finished helmet. The silver should be more metallic and I skimped on the black inking that lines the border of the trim and feathers into the gray, but I am really pleased with the overall look!


The finished costume for Halloween '11...thanks from taking a look!
Friday, September 23, 2011
Magneto Helmet Build pt. 1
I love Magneto’s look in X-Men: First Class, so much so that I’ve decided to do his costume for Halloween this year. I chose to tackle the biggest challenge first – his iconic and super sweet helmet. Part 1 covers my build of the master sculpt, and the forthcoming Part 2 will document my making of the mold and the casting of the final helmet. This is the first prop I’ve done that involves mold making and casting, and also the first time I’ve actually documented one of my costume builds…hope you enjoy!


The tricky thing about Magneto’s helmet is that you can see the wearer’s face, so scale is a big issue…if the helmet is a little too big or small, it’ll be noticeable. Symmetry is also a huge challenge with a prop like this, and so for these two reasons I decided to go high tech. I scanned my head into the computer and used Maya to model the helmet using every bit of reference I could get my hands on. My plan was to use TechShop’s CNC router to cut the base volume of my helmet using a toolpath that I generated from my 3D model. So if I got the scale wrong on my first try (which I did) I could try again. It also ensures that the finished sculpt will be 100% symmetrical.

The CNC router I’m using can only make relief cuts in the vertical axis, so that meant splitting the helmet model in half and routing the two sides separately. I removed all the trim detail from my model, cut it in half and added a sprue so that the part wouldn’t become loose in the machine after it was finished with the job.

Here’s one of the foam blanks that will become one half of the helmet. It’s made from several pieces of foam insulation board glued together with carpenters glue.

In order to hold the foam blanks in place while the router is cutting, I built a jig using 0.5” mdf and pegboard fastened together with brass screws. The router has a vacuum table that will suck the jig onto the table top, and the pegboard’s perforations will allow the vacuum to suck the blank into the jig. Hopefully this means the material will be kept nice and stable while the router does its work.

A blank in the jig. I made six blanks to insure myself against mistakes, and of course I ended up using every last one of them!

The loaded jig in the machine and ready for cutting!

Here the router is half way through its roughing pass removing all the excess foam.

Roughing pass done!

On to the finishing pass. It’s mesmerizing watching this thing work.

I can’t believe I sat watching this thing for the entire hour and a half it took to do this part.

Two finished helmet halves on their sprues.

Halves glued together and sprues removed.

The stepping left by the machine is very apparent on the back of the dome. Lots of work ahead of me…

Here I’ve roughly sanded the entire helmet to get rid of the stepping left by the router.

I also couldn’t help mocking up the trim with paper. I won’t actually be adding the trim until much later, but since it really affects the look of the helmet, I wanted to do a test to make sure I was happy with it. The helmet looked good to me compared to my reference, so time to move on to the next stage.

Insulation foam is great for shaping, but it won’t do for the final surface of the sculpt. It’s porous, easily damaged, and worst of all, reacts badly to stuff like super glue, body filler and modeling putty…all of which I’ll be using to finish the helmet. So I’ve covered the entire helmet in polyurethane resin to form a hard outer shell that I can sand and fill and resand to my heart’s content.

I scuffed the helmet with some 60 grit sandpaper, primed it and started sanding. You can see how uneven the helmet surface is after the application of the resin.

I had lots of little hills and valleys, so after sanding down all of the hills…

…I filled in the valleys with bondo.


After a good sanding, another shot of primer. Looking better. The process of sanding, filling, and sanding again, slowly working my way up through finer grit sandpaper, took me a couple of days until I had a smooth and even shape.

I couldn’t start working on the trim until the base was shaped and smooth - if I noticed a problem after I had applied the trim, it would be way more difficult for me to fix. So I made sure I was happy with it before I started messing with the trim. Here I’m again mocking up all the trim with paper so I can have a template when I move on to styrene.

The trim is cut from 1.5 mm styrene sheet, here the left half is applied to the helmet. I freaking love super glue.

On a side note, I cut all the pieces before applying any to the base, that way I could pair them up with each other back-to-back to ensure they were symmetrical. Some areas like the nose guard were too difficult to bend a piece of styrene around, those will be filled later with body filler.

First pass filling, puttying and sanding the edges. The pinkish stuff is the bondo and the green is modeler’s putty, which I swear by for use in smaller detail areas. It sets up a lot faster than bondo so it’s not suitable for large areas, but it goes on so smoothly and sands really well!

After sanding the entire helmet, I gave the whole thing a shot of gray primer, and while you can’t really see them in the photo, the areas that need work are very apparent. The tips of the V above the eyes are flat and don’t catch light the way I want, so those require sanding. I need to fill the gap left between the styrene and the base with putty just about everywhere and sand that down. And most importantly, the bevels around the eyes still need to be added.

Big leap here…I was lazy and didn’t take any process photos. The sculpt is about 95% complete. The trim is integrated with the helmet base and the bevels are IP, but looking okay so far. The interior of the helmet is going to be left rough, since once I make casts that area will be cut out anyways. Just a little more shaping and filling on the bevels and it’ll be ready for a final wet sand before mold making.

A couple more shots of the near finished sculpt...


Stay tuned for pt. 2, mold making and casting!
Subscribe to:
Posts (Atom)